The attached files are 3D PDF’s, you need to save them first and open them with Acrobat Reader afterwards.
I was playing around a litte with Sketchup,Eagle and the Eagleup-ulp scritpt. The result is the attached pdf-File
The attached files are 3D PDF’s, you need to save them first and open them with Acrobat Reader afterwards.
I was playing around a litte with Sketchup,Eagle and the Eagleup-ulp scritpt. The result is the attached pdf-File

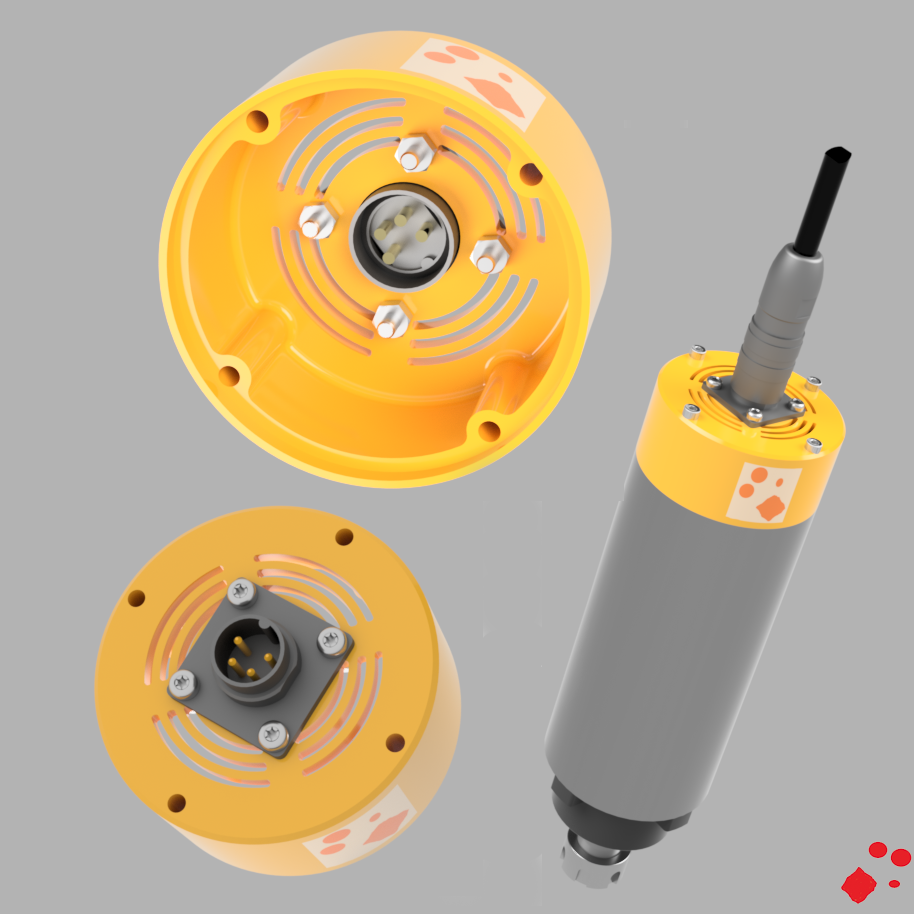
I adapted China air cooled spindle with GND to be save when Spindle get’s an electrical damage. (Did for 800W and 1.5kW spindle from different sellers) –> Spindel outer diameter 65mm Print orange part with 3d Printer –> File as GCode attached to this post. –> ABS Fillament used 10,35m 1.75mm –> It tooks me about 4.5 hours to print on my 3d printer Should work for all air cooled China Spindle

High Resolution of Rendered Picture
Needed Parts: 1 x Lumberg LUM 0318-04 1 x Lumberg LUM 0322-04 3m x Ölflex 110 CY 4G 0.75mm^2 3 x M3 x 45mm 4 x M3 x 10mm 1 x M3 x 8mm 4 x Mutter M3 1 x Kabelschuh M3 –> Connection Ground (GND) I used only three M3 x45 screws because the 4th thread is used to connect grounding to the spindel. Remove the distance holder to get space for the screw to connect GND to spindle
Plug connection:
PIN 1 –> Cable 3 PIN 2 –> Cable 2 PIN 3 –> Cable 1 PIN 4 –> GND If spindle turns in wrong direction after connecting to inverter, exchange cable (ex. PIN1 and PIN2) –> Now it should turn in correct direction.
Frässpindel_Deckel_Stromanschluss_LumbergHello all, Currently I’m going to adapt my Arduino 9 Shield Board for securing my CNC Maschines against unallowed access. Code has been used together with an older Arduino Nano Shield. Following fuctions are implemented:
Arduino9_Lock.ino – File Version 2.4

Generated Gcode with Eagle –> pcb-gcode.ulp
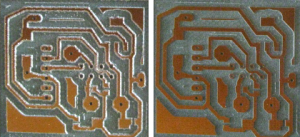
It’s very important to have a clamp with a run out (circulation) as small as possible. See picture bellow (left I used a bad clamp and on the right a good one). With same mill
PCB on the right has been milled with about double feed rate
Used tool 60° VHM Mill
Generation Options
Feed rate X,Y: 500mm/s
Spot drill holes: -0.55mm
Minimum: 0.0254mm
Maximum: 1.6mm
Step Size: 0.127mm
Maschine Z Down: -0.2mm
Tool Dia: 0.23094mm
–> dependend on ZDown and Mill° (60° and -0.2) –> Calculated –> (tan(30°)*2)*ZDown= 0.23094mm
| Angle ° | Z Down (-) | Tool Dia |
|---|---|---|
| 60° | 0.2mm | 0.23094mm |
| 60° | 0.15mm | 0.17324mm |
| 30° | 0.2mm | 0.10718mm |
| 30° | 0.15mm | 0.08038mm |
GCode Style
–> Mach3